
Triggers control when and how your popups appear. Choose the right trigger, and your popups feel helpful rather than intrusive.
Simply Popups gives you five powerful options:
- Button Click – Let visitors open popups on their own terms
- Page Load – Greet visitors the moment they arrive (with optional delay)
- Exit Intent – Capture attention before someone leaves
- Link – Open popups from text links
- Image – Trigger popups by clicking images
This guide walks you through each trigger type so you can match the right one to your goals.
Understanding Triggers
A trigger is the action or event that causes your popup to display. Choosing the right trigger is crucial for:
- User experience – Avoiding popup fatigue
- Conversion rates – Showing popups at the right moment
- Engagement – Capturing attention without being intrusive
Available Trigger Types
Lite Version (Free)
Button Click Trigger
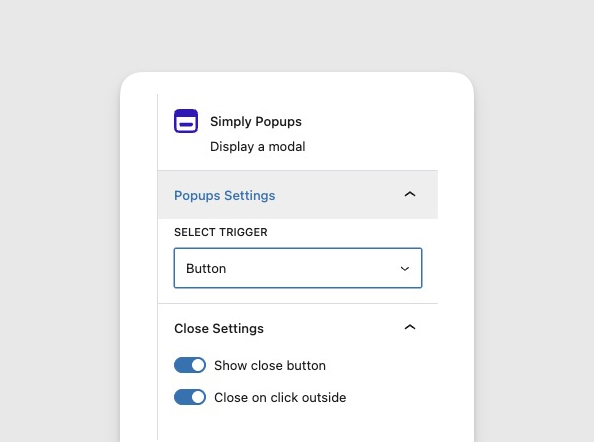
Display: When a visitor clicks a button
Best for: User-initiated popups, calls-to-action, detailed information
The most common and user-friendly trigger. Visitors control when they see the popup by clicking a customizable button on your page.
Advantages:
- Non-intrusive (user chooses to engage)
- No surprise interruptions
- Clear call-to-action
- Fully customizable button design
Use cases:
- “Learn More” buttons for detailed content
- Newsletter signup prompts
- Video players
- Contact forms
- Terms and conditions
Pro Version (Premium)
Page Load Trigger (Pro)
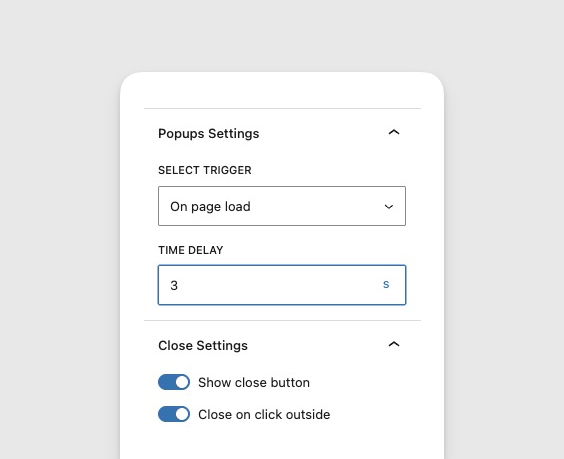
Display: Automatically when page loads
Best for: Important announcements, immediate offers, time-sensitive information
The popup appears as soon as (or shortly after) a visitor lands on the page, without requiring any action.
Advantages:
- Guaranteed visibility
- Immediate message delivery
- No need for button space on page
- Can include optional delay timing
Disadvantages:
- Can be intrusive if overused
- May increase bounce rates
- Can annoy returning visitors
Use cases:
- Site-wide announcements
- Cookie consent notices
- Age verification
- Welcome messages for new visitors
- Flash sales or urgent promotions
Exit Intent Trigger (Pro)
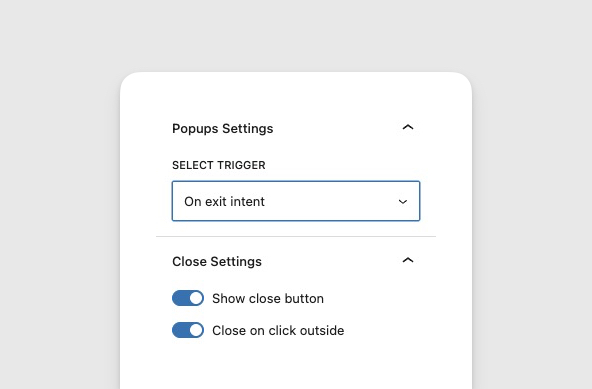
Display: When visitor moves to leave the page
Best for: Last-chance offers, cart abandonment prevention, exit surveys
Detects when a visitor’s cursor moves toward the browser’s close button or address bar, indicating they’re about to leave. The popup appears at this critical moment.
Advantages:
- Non-disruptive (triggers when leaving anyway)
- Last opportunity to engage
- Proven to reduce abandonment
- Shows once per page visit
Behavior:
- Desktop: Tracks cursor movement toward top of browser
- Mobile: Different detection method (less reliable)
- Triggers once per session (requires page refresh to trigger again)
Use cases:
- Discount codes to prevent cart abandonment
- Newsletter signup for bouncing visitors
- Exit surveys or feedback requests
- Special offer to retain visitors
- Content upgrades before leaving
Link Trigger (Pro)

Display: When visitor clicks a text link
Best for: Inline content expansion, subtle triggers, text-based calls-to-action
Similar to button trigger, but uses styled text links instead of button blocks. Includes customizable link color and hover color.
Advantages:
- More subtle than buttons
- Fits naturally in text content
- Customizable link and hover colors
- Less visually prominent
Customization:
- Link color – Default text color
- Hover color – Color when mouse hovers over link
Use cases:
- Terms and conditions links
- “Read more” links in blog posts
- Definition popups in educational content
- Reference citations
- Footnote expansions
Image Trigger (Pro)
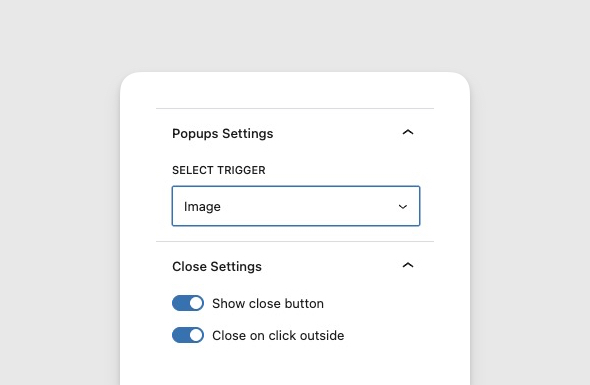
Display: When visitor clicks an image
Best for: Image galleries, lightboxes, visual content expansion
Uses any WordPress image block as a trigger. Clicking the image opens the popup with additional content.
Advantages:
- Intuitive for image galleries
- Visual call-to-action
- Uses standard WordPress image blocks
- Perfect for portfolios
Configuration:
- Add a WordPress Image block
- Configure as trigger in popup settings
- Image can have caption, alt text, etc.
Use cases:
- Photo galleries with descriptions
- Portfolio pieces with details
- Product images with specifications
- Before/after comparisons
- Visual tutorials or demos
Trigger Comparison Table
| Feature | Button | Page Load | Exit Intent | Link | Image |
|---|---|---|---|---|---|
| Version | Lite | Pro | Pro | Pro | Pro |
| User Control | Yes | No | No | Yes | Yes |
| Intrusive Level | Low | High | Medium | Low | Low |
| Guaranteed View | No | Yes | High | No | No |
| Best for New Visitors | Good | Excellent | Good | Good | Good |
| Best for Return Visitors | Excellent | Poor | Good | Excellent | Excellent |
| Mobile Friendly | Excellent | Excellent | Good | Excellent | Excellent |
| Conversion Potential | High | Medium | Very High | Medium | Medium |
| Customization | High | High | Medium | High | High |
Choosing the Right Trigger
Decision Flowchart
Is your message urgent or time-sensitive?
- Yes → Use Page Load trigger (with optional delay)
- No → Continue…
Do you want user control?
- Yes → Use Button, Link, or Image trigger
- No → Continue…
Are you trying to prevent visitors from leaving?
- Yes → Use Exit Intent trigger (Pro)
- No → Continue…
Do you want to target engaged visitors only?
- Yes → Use Page Load trigger with a delay (Pro)
- No → Use Page Load trigger with no delay
Use Case Recommendations
Newsletter Signups:
- Primary: Button or Exit Intent (Pro)
- Alternative: Page Load with 30-second delay (Pro)
Product Promotions:
- Primary: Button or Page Load
- Alternative: Exit Intent (with discount) (Pro)
Important Announcements:
- Primary: Page Load
- Alternative: Page Load with 5-10 second delay (Pro)
Portfolio/Gallery:
- Primary: Image trigger (Pro)
- Alternative: Button per image
Terms & Conditions:
- Primary: Link trigger (Pro)
- Alternative: Button
Cart Abandonment:
- Primary: Exit Intent (Pro)
- Alternative: None (exit intent is specifically designed for this)
Content Upgrades:
- Primary: Page Load with delay (Pro)
- Alternative: Button at end of content
Combining Multiple Triggers
You can use different trigger types on the same website for different purposes:
Example Setup
Homepage: Page Load popup with welcome message
Blog Posts: Page Load popup with 30-second delay for content upgrades
Product Pages: Exit Intent popup with discount code
About Page: Button trigger for contact form
Best Practice: Don’t show more than one automatic popup per page. Combine automatic triggers (page load, exit intent) with manual triggers (button, link, image) for the best user experience.
Trigger Best Practices
For All Triggers
- Provide easy exit – Always show close button or allow click-outside
- Test on mobile – Verify triggers work on all devices
- Monitor analytics – Track which triggers perform best
- Respect users – Don’t show the same popup repeatedly
For Automatic Triggers (Page Load, Exit Intent, Delayed)
- Use sparingly – One automatic popup per page maximum
- Valuable content – Make the interruption worth it
- Frequency control – Consider cookie-based limits
- A/B test timing – Find optimal delay times
For Manual Triggers (Button, Link, Image)
- Clear labeling – Button text should indicate action
- Visual prominence – Make triggers easy to find
- Contextual placement – Position triggers logically
- Multiple options – Provide several ways to trigger if important
Selecting Triggers in the Block Editor
When editing a Simply Popups block:
- Select the parent Simply Popups block (not button or content)
- Look at the right sidebar for block settings
- Find the Trigger or Select Trigger dropdown
- Choose your desired trigger type
You must select the parent “Simply Popups” block to see trigger settings. Learn about block selection.
Available in Lite: Button
Available in Pro: Button, Link, Image, Page Load, Exit Intent
Upgrading to Pro for Advanced Triggers
If you’re using Simply Popups Lite and want access to Page Load, Exit Intent, Link, or Image triggers:
- Purchase Simply Popups Pro
- Install and activate the Pro version
- Activate your license key
- Edit your popups to use Pro triggers
All existing popups continue working after upgrading. You don’t need to recreate anything.
Frequently Asked Questions
Can I use multiple trigger types in one popup?
No. Each popup can have only one trigger type. However, you can create multiple popups on the same page, each with different triggers.
Do triggers work the same on mobile devices?
Most triggers work identically on mobile. Exit Intent works differently on mobile devices due to cursor detection limitations—it may use alternative detection methods like scroll depth or touch gestures.
Can I test triggers before publishing?
Yes, use the Preview function in the block editor. Note that some triggers (exit intent, page load with delay) may not work in preview mode. Publish the page to test fully.
Will popups show to the same visitor repeatedly?
By default, yes. To limit frequency, you’ll need to implement cookie-based tracking or use a plugin that manages popup display frequency. This feature may be added in future versions.
Can I change the trigger after creating a popup?
Yes! Edit the page, select the Simply Popups block, and choose a different trigger from the dropdown. Your content remains unchanged.
Do I need coding knowledge to use any trigger types?
No. All trigger types are configured through the WordPress block editor with simple point-and-click options. No coding required.
Related Articles
- Button Click Trigger – Set up button-triggered popups
- Page Load Trigger – Configure automatic popups
- Exit Intent Trigger – Catch leaving visitors (Pro)
- Link Trigger – Use text links as triggers (Pro)
- Image Trigger – Use images as triggers (Pro)
- Popup Best Practices – UX guidelines
- Simply Popups Pro Overview – Learn about Pro features