
The Page Load trigger is a Simply Popups Pro feature that automatically displays your popup when a visitor arrives on your page. This is the most direct way to ensure your message is seen, making it ideal for important announcements, age verification, or cookie consent notices.
How the Page Load Trigger Works
Unlike the button trigger which requires user interaction, the Page Load trigger activates automatically.
- Immediate Visibility: The popup appears as soon as the page finishes loading.
- High Engagement: Guarantees 100% visibility for your message.
- Pro Feature: Requires Simply Popups Pro.
Setting Up a Page Load Popup
- Ensure you have Simply Popups Pro installed and activated.
- Add the Simply Popups block to your page.
- Select the parent Simply Popups block.
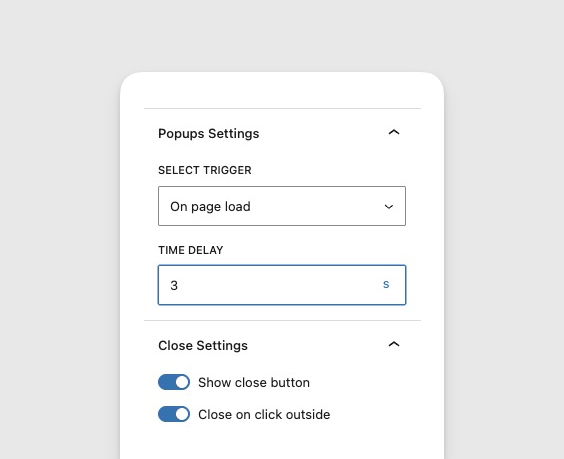
- In the sidebar settings, find the Trigger Type dropdown.
- Select On page load.
In the editor, the popup will not automatically open to prevent it from interfering with your design work. You can click the “Preview” button in the toolbar to see it in action, or view the published page.
Best Practices for Page Load Popups
Automatic popups can be intrusive if not used carefully. Follow these tips to maintain a good user experience:
1. Use Sparely
Don’t put page load popups on every page. Reserve them for the most critical information, such as:
- Global announcements (e.g., “We are closed for holidays”)
- Legal notices (e.g., Age verification, GDPR)
- First-time welcome offers
2. Provide an Easy Exit
Always ensure the Close Button is enabled and visible. Frustrated users who can’t close a popup will leave your site immediately.
3. Check Mobile Experience
Page load popups on mobile devices can cover the entire screen. Ensure your content is concise and the close button is easily tappable on small screens.
Adding a Time Delay
Instead of showing immediately, you can configure the popup to wait for a specified number of seconds before appearing. This “Delayed Display” is often more effective because it lets the user read some content before being interrupted.
- Select the parent Simply Popups block.
- Set the Trigger Type to On page load.
- Enter the desired time in the Delay (seconds) field.
- Example: Enter
3for a 3-second delay. - Example: Enter
10for a 10-second delay.
- Example: Enter
Choosing the Right Delay Time
The timing of your popup can significantly impact conversion rates.
- Immediate (0 seconds): Good for critical alerts, but can be intrusive.
- Short Delay (3-5 seconds): Good for quick offers or welcome messages. Ensures the user has at least seen the page content.
- Medium Delay (10-15 seconds): Best for newsletter signups. Targets users who have shown interest by staying on the page.
- Long Delay (30+ seconds): Targets highly engaged readers. Good for “content upgrades” or deep-dive offers.
The “Read First” Strategy
A common mistake is showing a “Sign up for our newsletter” popup immediately. The user doesn’t know if your content is good yet!
Using a delay of 15-30 seconds ensures the visitor has read a significant portion of your article. If they are still there after 30 seconds, they like your content and are much more likely to subscribe.